
The UMAX Scanner Astra 4000U Vista Scan or vistascan driver listed below is version 3.81 of the scanner driver. This Vista Scan version supports only the Astra 4000U, under Windows 98/SE/Me/2000/XP. Note the operating systems which it will operate on. The hardware is rather old so finding a new driver is going to be tough.
UMAX Scanner Astra 4000U VistaScan
You will need to download the file. Then extract the content of the file and click on the .exe file. This will not install the UMAX scanner driver. You can now see the driver listed below. This is the Vistascan driver from UMAX. Once installed the system will now test the scanner. Most of these scanners on the market is found now mainly on the secondhand market. This is the VistaScan 3.81 driver.
Download the file below and extract the content. There is only one file in the zip file. You can then click on the EXE file and the driver will then install. If you are using a more modern system then you can also right-click on the file and click on ‘Troubleshoot Compatibility” on the new menu that shows after you right-click on the EXE file. Windows 10 will then attempt to install the driver in an emulator mode so that it will work on the more modern systems.
There are also a number of other drivers on this website fro UMAX. These include the UMAX usc 5800 scanner driver as well as the jmb38x ms host controller and the Ricoh PCIe SD/MMC Driver. The driver is very easy to install and you can also search this website for more information. If you do not find this wo work as the driver are all more than 10 years old. These types of scanners was stopped manufacturing more than 11 years ago.

UMAX Scanner Astra 4000U VistaScan Driver
(Click accept as Chrome blocks the file)
![]()
Installing older drivers in Windows 7,8 as well as Windows 9, 10 and Windows 11.
- Find the Program: First, locate the program you want to run. This means finding the software you’re having trouble with, like a game or an app.
- Right-Click It: Click the right mouse button on the program you found. It’s like giving it a special click with your right hand.
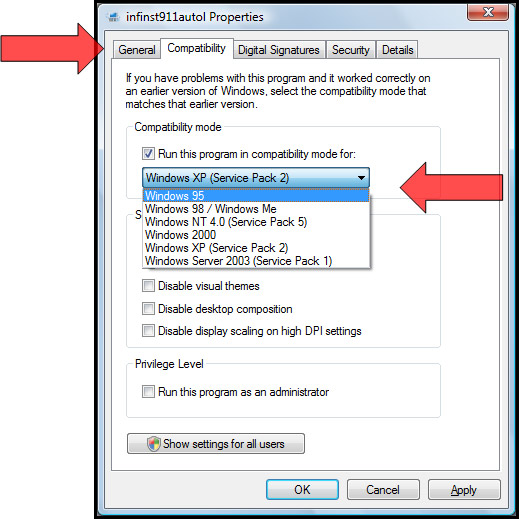
- Choose “Properties”: In the menu that pops up, you’ll see a word that says “Properties.” Click on that. It’s like looking at the details of the program.
- Click on “Compatibility”: Inside the “Properties” window, you’ll find some tabs at the top. Click on the one that says “Compatibility.” It’s like choosing the “how it works” part.
- Check “Run this program in compatibility mode for”: You’ll see a box that you can tick. It says “Run this program in compatibility mode for.” Tick the box by clicking it. This means you want to make the program work as if it’s older.
- Select the Right Windows Version: Now, there’s a drop-down menu right below where you ticked the box. Click on that menu and choose which version of Windows you think will make the program work. It’s like telling your computer to act like it’s an older one.
- Click “Apply” and “OK”: After you chose the right version of Windows, there are two buttons at the bottom. Click “Apply” and then “OK.” This is like saying, “Okay, make it work this way.”
- Try Running the Program: Now, try to run the program again like you usually do. It might work better now!
If the program was having trouble before because it was made for an older Windows, using compatibility mode can help it run more smoothly on your computer.
![]()
Incoming Search Terms:
- controladores para escaner UMAX Astra 4000U
- umax scanner 5800 drivers download
- umax scanner usc 5800 driver
- сканер umax astradriver
Related Posts
- UMAX usc 5800 Scanner Driver (0.992)
- VIA VT8261 Card Reader Driver (0.008)
- Ricoh PCIe SD/MMC Driver (0.008)
- Realtek USB 2.0 Card Reader Driver (0.008)
- JMB38X SD Host Controller Vista (0.008)